+ This section contains examples and guides from Project members, including external resources.
If you find an error or want to add an article to this list - report it to technical support.
+ For publishing articles or videos as a beginner's guide or for sharing experiences (with a referral link to the Project), you will receive a bonus to your limit for each active member who comes from your article to our Project.
 Connecting Raspberry Pi to the Project
Raspberry Pi can also be used to transmit readings to the project server. Listed below are links to some of the methods of removal of indications with the help of a Raspberry Pi with a view to their long-distance transmission to the server of the project according to the transmission protocol of the sensors readings.
- Working with Public Monitoring in Python with Raspberry Pi / Habr
- Sending temperature data from TL-MR3020 and Raspberry Pi router to "people monitoring" / Habr
- Connect the wireless radiation dosimeter to the "Public monitoring" service via Raspberry PI / Habr
- The History of the interaction of "teapot" by DS18B20 and Raspberry Pi send data to the narodmon.ru / Habr
Questions, comments and additions - write to admin @ narodmon.ru
 Connecting Arduino devices to the Project
For transmission of sensor readings can be used designs based on Arduino or Freeduino. Listed below are links to some variants of implementation of removal of the sensor readings and transmitting them to the project server according to the transmission protocol.
- A simple example of obtaining and sending temperature to narodmon.com / ESP8266
- Arduino Weather Station (OREGON EDITION)
- Monitoring the temperature in the hive at Wemos D1
- Weather station clock (half an hour) / Devicter.ru
-
- A bunch of UNO+EFcom v1.2+Public monitoring / Arduino.ru
- Send data via GPRS to the service "Public monitoring" / JT5.ru
- Control of humidity and temperature the home and beyond DIY / Star-t-hinking
- Weather home wireless weather sensor from Arduino Pro Mini / MYSKU.ru
- Connecting an Arduino to Russian project of Public monitoring / Student-proger.ru
- Barometric Pressure Sensor Module for Arduino or how to make a weather station with your own hands / MYSKU.ru
- The weather station on the Arduino and the MR3020 for the Public monitoring / cxem.net
- Connect Arduino Pro Mini + Enc28j60 + DHT11 + DS18B20 to the service narodmon.com / @imarh.ru
 Connecting Oregon weather stations to the Project
Weather stations and external sensors from Oregon can also be used to transmit readings to the Project server.
The following is an example of the implementation of transmitting readings to narodmon.com from the Oregon Scientific WMR88 weather station using the service Meteoplug or < a href="http://www.meteobridge.com/wiki/index.php/Home">Meteobridge.
1. The TP-Link TL-MR3020 router (or compatible) should already fully work with the Meteoplug or Meteobridge service. Those. You must already have registered, entered data about your weather station and all sensors connected to it according to the instructions on the Meteoplug or Meteobridge websites.
There is no need to enable the Meteoplug Cloud Graphing module in the Meteobridge settings.
2. All that remains is to upload a script to the router once, which, according to the schedule, every 10 minutes will take the latest readings from the standard weather station sensors (they are accumulated in the router), will form new data from them in a new format and will send them to narodmon.com.
3. Connect to your router using PuTTY and run the commands:
# Go to the root of the disk
cd/
# Download the script
wget http://narodmon.com/apps/oregon-uni.sh
# Give the script execution rights
chmod 755 oregon-uni.sh
4. If the router works with the Meteoplug service, then you need to copy and paste the following lines into the command line and press Enter.
echo "0 0 * * * /etc/init.d/loggerd stop; echo -n > /tmp/run/meteohub/inetupload; /etc/init.d/loggerd start" >> /etc/crontabs/root
echo "*/10 * * * * /oregon-uni.sh" >> /etc/crontabs/root
The first line at midnight restarts the data acquisition program and truncates the data file, otherwise it will swell over time.
The second line runs our script every 10 minutes.
5. If the router works with the Meteobridge service, then you need to copy and paste the following lines into the command line and press Enter.
echo "0 0 * * * /etc/init.d/loggerd stop; /etc/init.d/loggerd start" >> /etc/crontabs/meteobridge
echo "*/10 * * * * /oregon-uni.sh" >> /etc/crontabs/meteobridge
The first line at midnight restarts the data collection program.
The second line runs our script every 10 minutes.
6. Additional information about Oregon weather stations and sensors:
- Flashing Meteobridge Firmware
- Arduino Weather Station (OREGON EDITION)
- Weather Station Data Logger / SourceForge
- Decoding the Oregon Scientific V2 protocol / JeeLabs
- Oregon Scientific USB Station Logger/Reader / Google Project Hosting
- Weather station with clock (half an hour) / Devicter.ru
- Arduino&Oregon or do-it-yourself weather station / Habr
- Choosing a digital thermometer/weather station with a wireless temperature sensor for outdoor and home / iXBT Conference
- Full step-by-step instructions for connecting Oregon THN132N
 Connecting Misol, WeatherSmart weather stations to the Project
To send data from a weather station, it must support selecting a custom server to send data to Weather Logger.
In the Weather Network \ Weather Station Settings section you specify:
Remote Server: Customized
Server IP/Hostname: narodmon.com (or eu.narodmon.com)
Server Port: 80
Server Type: PHP
Station ID: Specifies a unique MAC (serial number) that should be entered when registering a station in the project.
Password: can be left blank.
Tested on Conrad firmware 2.1.9 and 2.2.5.
Important! To avoid blocking, the transmission interval should be set to 5 minutes (default 1 minute) or pay to reduce the interval in the project.
Additional Information:
- Conrad firmware
- Buy on Aliexpress
- Description of the IpObserver station
 Connecting weather stations AMBWeather, EasyWeather to the Project
In the built-in web interface of the stations, enter the following:
Hostname: narodmon.com (or eu.narodmon.com)
Path: /post
Port: 80
Upload Interval: 300
Then save the settings and reboot the station.
To register a station in a project, use the value of the PASSKEY parameter.
Tested on station models WS2350 and WS-2902.
 Power supplies and 99% error in humidity sensors
If you use very common hygrometers and they constantly show 99% humidity, then this article is for you.
It turned out that the sensors are very sensitive to the quality of the power supply, ripples with a range of 150-200 millivolts completely paralyze the humidity channel, while the temperature channel and the bus exchange work normally and the checksums match. And since today many radio amateurs use ready-made power supplies worth 100 rubles, you should not be surprised that their quality is very lame. And power supply from the USB port of a computer is also often not ideal. Most all-digital devices don't get in the way, though. And it also happens that the new power supply unit works fine, and after a week there is noise and the sensor connected to it starts to lie.
So, if your sensor constantly shows 99% and is powered by a voltage of 5 volts, then try first to replace the power supply with a known normal one. Unfortunately, you may have to go through several different power supplies, preferably from different manufacturers. However, a good power supply unit will not cost 100 rubles, and it may simply not be at hand. As a very simple solution, you can simply try to put a 270-560 Ohm resistor in the break of the sensor power wire (the wire going to the Vcc contact).
This works, since the current consumed by the sensor is very small, only 3 milliamperes, then this resistor will not “drain” the power much, and the stabilizer already in the sensor will still lower the voltage to three volts. At the same time, together with the capacitor already present in the sensor, this resistor forms a completely effective RC filter.
Well, some pictures:
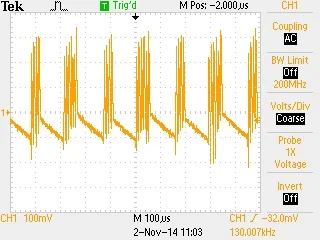
Let's take an average power supply unit - a charger. The label says 5V 1000mA.
This is how the noise coming to the Vcc sensor leg from this power supply looks like.

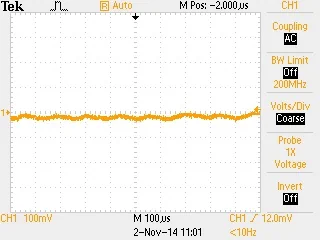
And this is how the picture looks after installing the resistor and, accordingly, the sensor began to work.

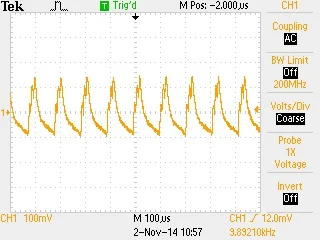
A picture from another power supply unit with a proud inscription 5V 1000mA. With this power supply, the sensor also shows 99%.

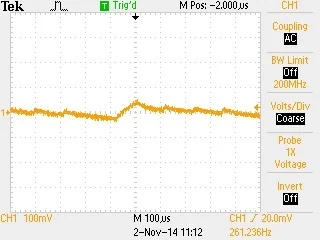
And here is a picture from the power supply that comes with the MR3020 router.
This is also an inexpensive power supply, but as you can see, there is little noise and the sensor works great with it without any alterations.

In general, be careful when choosing a power supply :) Good luck!
Source: etrivia.ru/news/O-vybore-bloka-pitaniya.